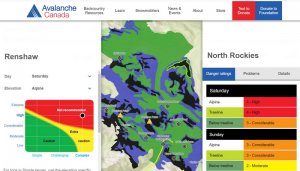
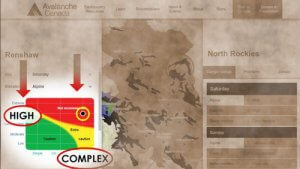
In order to use the Trip Planner of the AVALUATOR properly we need two pieces of information: the Avalanche Danger Rating and a Terrain Rating.
 To obtain the Avalanche Danger Rating we need to review the Public Avalanche Bulletin and choose the hazard rating of the elevation band and day that we wish to travel on. NOTE that if we are traveling Below Treeline and our choice is CHALLENGING or COMPLEX terrain then we must choose the highest level of predicted avalanche danger. i.e. if danger is rated as High, High, Considerable we would need to use High as the highest rating of danger even though the Below Treeline rating is only Considerable The assumption is that most CHALLENGING or COMPLEX avalanche terrain has exposure to other elevations.
Next we need the Terrain Ratings for the areas that we plan to ride. Some snowmobile areas have been professionally rated. This means that pockets of these riding areas have been classified as SIMPLE, CHALLENGING, or COMPLEX Avalanche Hazard.
Click HERE to go Avalanche Canada’s On-Line Trip Planning Tool.

The link above should have opened a new tab. Avalanche Canada will load a map with grey regions and small darker grey splotches. ? Nice technical term!
 Read the “Welcome” information on the left hand sidebar and be sure to scroll down to review the “Map Legend” and “How to Download” ATES ratings. Next, left click your mouse to move the map around to put the riding area you are interested in near the centre of your screen.
 Click on the + sign to zoom in. NOTE: If you double click on the map itself the current Avalanche Forecast will pop up on the right sidebar and the map will not zoom in. Always use the +/- symbols in the bottom right corner of the screen to zoom in/out. Continue to zoom and center the map. The grey polygons (ok…a more technical term I suppose 😉 ) will change color to green/blue/black, and text and contour lines will appear.
- Simple terrain (green) is either low-angled or forested terrain with no or very little exposure to avalanches. There are many options to reduce or limit exposure.
- Challenging terrain (blue) involves exposure to well defined avalanche paths, start zones, or terrain traps. There are options to reduce or eliminate exposure with careful route finding.
- Complex terrain (black) involves exposure to multiple, overlapping avalanche paths or large expanses of steep, open terrain with minimal options to reduce exposure.
 If you click on a colorful area of the map the Trip Planner will appear on the left sidebar and the current Avalanche Forecast will pop up on the right. You can close either of these sidebars by clicking on the small x on the top left of each sidebar.
 Note that the Trip Planner sidebar will plot your selection on the graph. The software knows that Terrain Rating, Elevation and Avalanche Hazard for your selection on the map and therefore has the information to display the potential risk. Of course this interactive system will fluctuate its graphical display depending on the Avalanche Hazard forecast for the time period.
 We recommend that you drill into riding areas that you are already familiar with to compare your perceptions of the potential hazards of the terrain with the professional Terrain Ratings that are displayed on the Trip Planner website.
Next, drill down into riding areas that you are planning future trips to. How much green and blue? Are these areas connected at all? Would this riding area be a good choice on a sketchy avalanche day? Can we reduce our risk by choosing less exposed terrain?
The Trip Planner is a great tool to get a big picture of the riding area. An even better tool when the ATES ratings are superimposed over Google Earth and overlayed with GPS tracks from your past or planned trips.
CLICK HERE for a quick Zacs Tracs tutorial using the Trip Planner, Google Earth and Giai GPS
